Saturday 20 October 2012

CONVERSION FROM UPPERCASE TO LOWER CASE USING C PROGRAM


Conversion from uppercase to lower case using c program

#include<stdio.h>
#include<string.h>
int main(){
  char str[20];
  int i;
  printf("Enter any string->");
  scanf("%s",str);
  printf("The string is->%s",str);
  for(i=0;i<=strlen(str);i++){
      if(str[i]>=65&&str[i]<=90)
       str[i]=str[i]+32;
  }
  printf("\nThe string in uppercase is->%s",str);
  return 0;
}


Algorithm:


ASCII value of 'A' is 65 while 'a' is 97. Difference between them is 97 – 65 = 32
So if we will add 32 in the ASCII value of 'A' then it will be 'a' and if will we subtract 32 in ASCII value of 'a' it will be 'A'. It is true for all alphabets.
In general rule:
Upper case character = Lower case character – 32
Lower case character = Upper case character + 32

swapping of two numbers in java all possible models


swapping of two numbers in java all possible models

MODEL:1
/*Program to swap 2 values with third variable temp*/

class Swap 

public static void main(String args[]) 

     int a=1; 
     int b=2; 
     int temp=0;
     System.out.println("Before swap: a="+a+"b="+b); 
     temp=a; 
     a=b; 
     b=temp; 
     System.out.println(" After swap: a="+a+"b="+b); 

} 

MODEL:2

/*Program to swap 2 values with out using third variable temp*/

class Swap 

public static void main(String args[]) 

     int a=1; 
     int b=2; 
     int c=0;
     System.out.println("Before swap: a="+a+"b="+b); 
     c=a; 
     a=b; 
     b=c; 
     System.out.println(" After swap: a="+a+"b="+b); 

} 

MODEL:3

/*Program to swap 2 values without using the temporary variable and Arithmetic operators*/ 
class Swap 

public static void main(String args[]) 

     int a=1; 
     int b=2; 
     System.out.println("Before swap: a="+a+"b="+b); 
     a=a^b; 
     b=a^b; 
     a=a^b; 
     System.out.println(" After swap: a="+a+"b="+b); 


MODEL:4
/*Program to swap 2 values without using the temporary variable and third variable*/ 
class Swap
{
public static void Swap()

{
      int a=1; 

      int b=2; 
      System.out.println("Before swap: a="+a+"b="+b); 
     
      //add both the numbers and assign it to first
      a=a+b; 
      b=a-b; 
      a=a-b; 
     System.out.println(" After swap: a="+a+"b="+b); 
}

Friday 19 October 2012

Captcha in JSP and Servlet

Note:  IMAGE MAGICK S/W  (imagemagick) is required to install in server based on OS

Captcha in JSP and Servlet


Captcha in JSP and Servlet
This tutorial explains how to create Captcha in JSP and Servlet. This example is created in eclipse IDE and run on tomcat server.  This example using following jar
  • imaging.jar
  • jstl-1.2.jar
  • simplecaptcha-1.1.1.jar
  • standard.jar
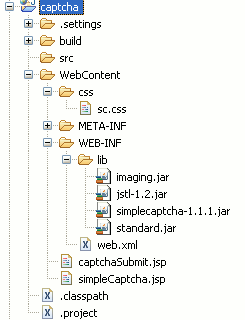
The application directory structure will look like as below, if you are using an Eclipse editor for developing the application.
1121captcha1.gif
There are the following steps for creating a such application :.
Step 1 :
First we create Dynamic web project "captcha" in eclipse IDE . Again we create "simplecaptcha.jsp" file under WebContent folder. The code of  "simplecaptcha.jsp"  are given as:

<%@ taglib uri="http://java.sun.com/jsp/jstl/core" prefix="c"%>

<!DOCTYPE HTML PUBLIC "-//W3C//DTD HTML 4.01 Transitional//EN">

<html>

<head>

<META http-equiv="Content-Type" content="text/html; charset=ISO-8859-1">

<title>Simple CAPTCHA Example</title>

<link href="sc.css" type="text/css" rel="stylesheet" />

</head>

<body>

<center>

<h3>Simple CAPTCHA Example</h3>

<img id="captcha" src="<c:url value="simpleCaptcha.jpg" />" width="150">

<form action="captchasubmit.jsp" method="post"><input type="text"

name="answer" /><br>

<input type="submit" value="Submit"></form>

</center>

</body>

</html>
Step 2 :
Again we create "captchasubmit.jsp" file under WebContent folder. This file used displays message for captcha code are correct or not. The code of  "simplecaptcha.jsp"  are given as:

<%@ page import="nl.captcha.Captcha"%>

<%
Captcha captcha = (Captcha) session.getAttribute(Captcha.NAME);

request.setCharacterEncoding("UTF-8");

String answer = request.getParameter("answer");

if (captcha.isCorrect(answer)) {

%>

<center><b>Correct Captcha Code !</b> <%

else {

%> <b>In Correct Captcha Code !</b> <%

}

%>

</center>
Step 3 :
 Now create css folder under WebContent  folder and create "styles.css" file under css folder. The code of  "styles.css" below :

body {

colorblack;

background-colorwhite;

font-family"Helvetica Neue", Arial, Helvetica, Geneva, sans-serif;
}
Step 4 :
Now you can open "web.xml" file and modify as:

<?xml version="1.0" encoding="UTF-8"?>

<web-app xmlns:xsi="http://www.w3.org/2001/XMLSchema-instance"

xmlns="http://java.sun.com/xml/ns/javaee" xmlns:web="http://java.sun.com/xml/ns/javaee/web-app_2_5.xsd"

xsi:schemaLocation="http://java.sun.com/xml/ns/javaee http://java.sun.com/xml/ns/javaee/web-app_2_5.xsd"

id="WebApp_ID" version="2.5">

<display-name>captcha</display-name>

<servlet>

<servlet-name>SimpleCaptcha</servlet-name>

<servlet-class>nl.captcha.servlet.SimpleCaptchaServlet</servlet-class>

</servlet>

<servlet-mapping>

<servlet-name>SimpleCaptcha</servlet-name>

<url-pattern>/simpleCaptcha.jpg</url-pattern>

</servlet-mapping>

<welcome-file-list>

<welcome-file>simpleCaptcha.jsp</welcome-file>

</welcome-file-list>
</web-app>
Step 5 :
Now download  imaging.jar, jstl-1.2.jar,simplecaptcha-1.1.1.jar and standard.jar  jar files and paste under  "WebContent/WEB-INF/lib" directory .
Step 6:
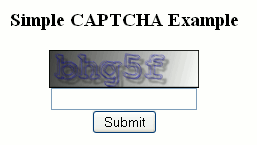
When run  this application on tomcat server the following output will displays as:
1121captcha2.gif
Again enter captcha code in text input box and click "Submit" button. If you enter invalid captcha code displays error message as :
1121captcha3.gif
If match captcha code displays message as:
1121captcha4.gif

Tomcat Hello World Servlet using Eclipse IDE


Tomcat Hello World Servlet using Eclipse IDE


1. Create Dynamic Web Project

Select from the menu File --> New --> Dynamic Web Project.
Create Dynamic Web Project
Enter "HelloWorldServlet" as the project name. Keep rest of the settings as it is as shown in the following screenshot.
Enter Servlet project name
Click "Next" button.
Configure project
Click "Next" button.
Configure web module setting
Check 'Generate web.xml deployment descriptor' checkbox and click "Finish" button and Eclipse IDE will generate the web project automatically as shown below
Generated web project

2. Create Servlet Class

Select from the menu File --> New --> Servlet.
Create Servlet Class
Write "com.srccodes.example" in the 'Java Package' field and "HelloWorld" in the 'Class Name' field. Click 'Next' button.
Define Servlet class
We can specify deployment descriptor (web.xml) specific information in the following screen. Just keep every thing as it is for the time being. Click "Next" button.
Configure deployment descriptor
Click 'Next' button.
specify modifier, interface
Eclipse will generate a Servlet class based on the configuration / input we provided in the previous steps and open the same in the Java Editor as shown below
File: HelloWorld.java
1
2
3
4
5
6
7
8
9
10
11
12
13
14
15
16
17
18
19
20
21
22
23
24
25
26
27
28
29
30
31
32
33
34
35
36
37
38
39
package com.srccodes.example;
 
import java.io.IOException;
import javax.servlet.ServletException;
import javax.servlet.annotation.WebServlet;
import javax.servlet.http.HttpServlet;
import javax.servlet.http.HttpServletRequest;
import javax.servlet.http.HttpServletResponse;
 
/**
 * Servlet implementation class HelloWorld
 */
@WebServlet("/HelloWorld")
public class HelloWorld extends HttpServlet {
    private static final long serialVersionUID = 1L;
        
    /**
     * @see HttpServlet#HttpServlet()
     */
    public HelloWorld() {
        super();
        // TODO Auto-generated constructor stub
    }
 
    /**
     * @see HttpServlet#doGet(HttpServletRequest request, HttpServletResponse response)
     */
    protected void doGet(HttpServletRequest request, HttpServletResponse response) throws ServletException, IOException {
        // TODO Auto-generated method stub
    }
 
    /**
     * @see HttpServlet#doPost(HttpServletRequest request, HttpServletResponse response)
     */
    protected void doPost(HttpServletRequest request, HttpServletResponse response) throws ServletException, IOException {
        // TODO Auto-generated method stub
    }
 
}
Note :
Notice the highlighted line number 13 in the above code. "/HelloWorld" is the servlet url that we need to specify in the browser url to access the same. This is annotation based approach to define servlet mapping. We can do the same in web.xml file as well. For simplicity we are moving forward with the annotation based approach that Eclipse generated for us.

4. Write Custom Code

Add your code inside 'doGet' method. 'setContentType' method of HttpServletResponse sets content type of the response to 'text/html' which is the standard MIME content type for Html pages. 'getWriter' method of the response object returns a PrintWriter object. This will be used to print our "Hello World!" string in the browser.
Edit the generated 'HelloWorld.java' as per the following code.
File: HelloWorld.java
1
2
3
4
5
6
7
8
9
10
11
12
13
14
15
16
17
18
19
20
21
22
23
24
25
26
27
28
29
30
31
32
33
34
35
36
37
38
39
40
41
42
43
package com.srccodes.example;
 
import java.io.IOException;
import java.io.PrintWriter;
 
import javax.servlet.ServletException;
import javax.servlet.annotation.WebServlet;
import javax.servlet.http.HttpServlet;
import javax.servlet.http.HttpServletRequest;
import javax.servlet.http.HttpServletResponse;
 
/**
 * Servlet implementation class HelloWorld
 */
@WebServlet("/HelloWorld")
public class HelloWorld extends HttpServlet {
    private static final long serialVersionUID = 1L;
        
    /**
     * @see HttpServlet#HttpServlet()
     */
    public HelloWorld() {
        super();
        // TODO Auto-generated constructor stub
    }
 
    /**
     * @see HttpServlet#doGet(HttpServletRequest request, HttpServletResponse response)
     */
    protected void doGet(HttpServletRequest request, HttpServletResponse response) throws ServletException, IOException {
        response.setContentType("text/html");
        PrintWriter printWriter  = response.getWriter();
        printWriter.println("<h1>Hello World!</h1>");
    }
 
    /**
     * @see HttpServlet#doPost(HttpServletRequest request, HttpServletResponse response)
     */
    protected void doPost(HttpServletRequest request, HttpServletResponse response) throws ServletException, IOException {
        // TODO Auto-generated method stub
    }
 
}

5. Run Your Servlet Code

Right click on the project 'HelloWorldServlet' and select from context menu 'Run As' --> 'Run on Server'.
Run on Server
Select the existing tomcat server. If not available then manually define a new web server.
Run on Server
Click "Finish" button. HelloWorldServlet web application will be deployed in the tomcat web server.
Deployed web application

6. Browser Output

Eclipse will open a browser and your server side code will print 'Hello World!' in the browser.
Browser Output

Download Source Code

SrcCodes : HelloWorldServlet.zip